
Have you lost or accidentally deleted all the data stored on your disk? Has your computer been an unfortunate victim of virus attack wiping all the data in the process? Or has a sudden system failure preventing you to access your data? Then, Worry not. With the all new recovery software, you can recover all your lost files, be it Videos, Audios, Documents etc. by means of 3 simple steps- Launch, Scan & Recover. So let us discuss the significance of data recovery software and how to recover lost files.
Data Recovery Software- Features at a Glance:
The latest version of the free data recovery software, developed and distributed by EaseUS offers a simple yet feature rich GUI aimed at restoring back your lost files easily and quickly. Currently, the said recovery software is capable of recovering back bits of data lost due to a host of reasons including hard drive damage, virus attacks, operating system crash, power failures, disk formatting, accidental deletion of files etc.
Moreover, the data recovery tool is capable of recovering files lost due to aforementioned reasons from a wide range of storage devices that includes hard drives (Internal and External), memory cards, USB drives, digital cameras to name a few.
The said software tool functions around three stages: Launch, Scan and Recover. We shall discuss each of these stages in detail in the How To guide later.
With the free version of recovery software letting you to recover lost data up to 2GB, you always have the option of upgrading the software to increase the recovery capacity.
How to Recover Lost Data using File Recovery Software:
First and foremost, download the latest version of the data recovery software free and install it on you computer system. Once the software is successfully installed, follow the below mentioned steps to recover your all important data files:
1. Launch:
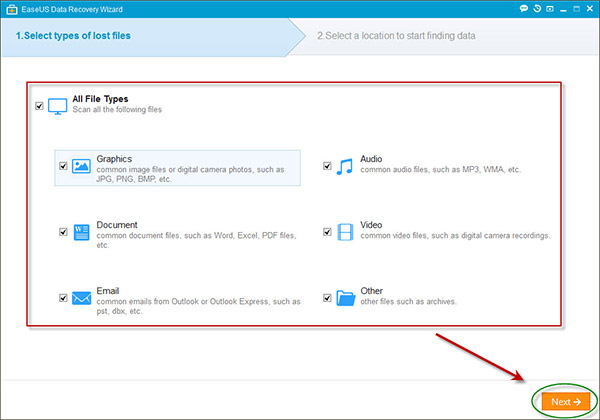
a) Launch the program by double clicking on its icon. Now, you will be navigated to the startup window of the recovery tool. Here, you need to choose the types of files you want to recover. The file types are divided into 6 broad categories, namely, Graphic, Audio, Document, Video, Email and Other. By default, all the categories are checked and you may uncheck them as per your wish. Once done with selecting file type, click Next.
b) Now you will be guided to a new window asking you to choose the drive location wherein you wish to scan for lost files. Select the appropriate location and click Scan.
2. Scan:
a) At the scanning stage, the recovery software scans through all the data in the location provided by the user in the previous step in order to search for lost files followed by their recovery.
b) At the top of the window, resides a progress bar that indicates the progress of the scanning taking place. You may click the Pause button to temporarily halt the scanning process or click the Stop button to stop the scanning altogether.
c) At the bottom of the window resides the Deep Scan button. It is recommended to use the Deep Scan option if you are not satisfied with the scan results.
3. Recovery:
a) The final stage in the recovery process, here you can preview the results of the scanning process. The results window is divided into 3 sectors: The leftmost sector shows the directory tree list. Choose a particular file from this list to see its detailed view in the middle sector. Moreover, you can also have quick preview of the file in the rightmost sector of the window.
b) Once you are done observing the scan results, you should now click the Recover button to restore all the lost files back into your computer system.